


EOS Proxy Voting
Having trouble deciding which EOS delegate to vote for from the list of over 400? If you’ve found that you still can’t choose after researching for the best EOS delegate or are just confused by the voting process, you still have another option. With EOS proxy voting, you can proxy your vote to someone else, giving them control over which delegate gets your vote. Basically, the other person votes on your behalf.
Proxy voting is an ideal opportunity if you want to participate in the EOS ecosystem but don’t have the time (or patience) to confidently vote for a Block Producer. Here are a few ways on how to set-up EOS proxy voting from both sides of the proxy process. (Say that one five times fast.)
You can find a list of EOS Proxy options at AlohaEOS.
Setting Your EOS Proxy via Command Line
If you’re comfortable with EOS’s command line tool, cleos, this is your simplest option.
To set a proxy through cleos, use the proxy command:

accountname1 is the name of your account.

proxyaccount is the name of the account to which you’re giving your vote.
Setting Your EOS Proxy via Toolkit
Several toolkits are available for the less tech-savvy among us. Toolkits like EOS Toolkit, MyEOSKit, and EOS Voter provide a clean interface for you to perform many of the commands that cleos offers.
Step 1. Before using one of those toolkits, you need to install Scatter. Scatter is an authentication browser extension that most EOS tools use. You should avoid EOS tools that don’t use it.
Step 2. After installing Scatter, create a new wallet. If you already have a wallet, you can import it instead.
Step 3. Next, navigate to your preferred toolkit and connect your Scatter account. Each toolkit will have slightly different instructions on how to do so.
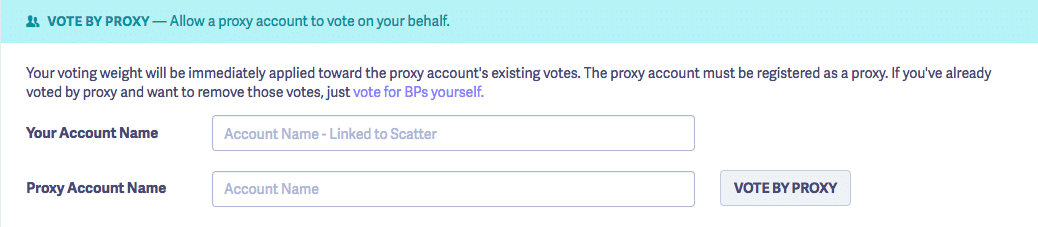
Step 4. After that, follow menu instructions to either manage voting, set proxy, or something similar.
Step 5. Finally, enter the account name of your proxy and confirm.
Registering as an EOS Proxy via Command Line
Just as with setting a proxy, you can register as a proxy through cleos.
To do so, run the following command:

someaccount1 is the name of your account.
Similarly, to unregister as a proxy, run:

Registering as an EOS Proxy via Toolkit
Not only can you set a proxy from a toolkit, you can also register as a proxy yourself. The steps are almost identical to setting a proxy.
Step 1. Connect your Scatter account to your favorite toolkit. EOS Toolkit, MyEOSKit, and EOS Voter are popular options.
Step 2. Navigate to the appropriate area in the toolkit. It will most likely be named proxy management, vote management, or something similar.

Step 3. From there, register as a proxy by entering your account name and confirming.
[thrive_leads id=’5219′]
EOS Proxy Voting – Wrap Up
Ideally, you should make your vote on your own. The more proxy voting the network has, the more centralized it becomes. However, we understand that you’re busy and you may not have the time to make an informed vote.
If that’s the case, at least ensure that you trust your proxy and have vetted them well. As an EOS token holder, you’re affected just as much as by the decisions the Block Producers make as any other network participant.


